
How to insulate a shipping container is the first thing you have to acknowledge before making a container warehouse. Why is that?
Container warehouses continue to grow in popularity as a sustainable and affordable option. With over 100 million empty containers in ports around the world, the opportunity to expand this innovative and sustainable warehouse alternative will only grow.
However, one of the drawbacks of shipping containers is that they are made of steel, which is not a good insulator. This means that goods that you store inside of the container warehouse can get very hot in the summer and very cold in the winter.
One of the biggest challenges facing container warehouses is finding the right way and the right materials to insulate them. Fortunately, there are several insulation options available to turn empty containers into a viable place to safely store goods.
To properly insulate your warehouse container, read this article until the end!
Why Do You Need to Insulate Your Shipping Container Warehouse?
Insulation is generally a material used to reduce the transfer of heat between two objects or surfaces. Insulating a shipping container warehouse is important for several reasons, especially if you use it as storage. Shipping containers, especially when exposed to the sun, can absorb a lot of heat and become unbearably hot inside.
Insulation helps reduce heat transfer, keeping the interior cooler in hot climates. Meanwhile, in colder weather, containers can quickly lose heat. Insulation helps retain warmth inside the warehouse.
Temperature fluctuations or extreme conditions can damage goods, especially those sensitive to temperature changes, like electronics, perishable items, or chemicals. It also can cause the container’s metal to expand and contract, leading to wear and tear over time. Insulation helps create a more stable environment and reduces these temperature swings to protect these items.
For workers inside the warehouse, insulation makes the environment more comfortable by regulating temperature and reducing the impact of outdoor weather conditions. This is important for safety and productivity.
Insulation also can reduce the need for excessive heating or cooling, leading to lower energy consumption. This can cut down on utility costs over time, making your warehouse more energy-efficient and cost-effective.
Challenges of Insulating a Container Warehouse
The main challenge to properly insulating a container warehouse is related to the shallow depth of the container’s walls. While the metal structure of the container is a sturdy and durable wall material, the lack of thickness poses challenges for proper insulation.
Therefore, you should first determine how you want to construct the walls before deciding on the insulation material for your container home. If you are connecting multiple containers for your container warehouse, adding space to the inside of the walls may not be an issue due to the larger size of the home.
However, if you are opting for a small one from just one or two containers, space will be at a premium. In this case, you may be better off adding insulation to the outside and then covering it with an exterior layer. Then, choose to leave the inside walls as bare metal or cover them with some interior plaster.
Insulation Material Types for Shipping Containers

You can use several types of insulation on how to Insulate a shipping container warehouse. The choice of insulation will depend on several factors, such as climate, the intended use of the container, and budget.
1. Spray Foam Insulation
Spray foam insulation is ideal for containers that will be used in extremely cold or hot climates. This is a mixture of chemicals that react when sprayed onto a surface to create a hardened foam. This type of insulation creates an airtight seal, which prevents heat from escaping or entering the container. It also helps prevent moisture buildup.
Spray foam is considered to be one of the easiest and quickest ways to insulate your container warehouse. However, it is a product of the petrochemical industry, which is not a good sign of sustainability. Also, the EPA has identified potential health hazards associated with Spray Foam Polyurethane insulation, including asthma, lung damage, and other respiratory illnesses.
Material Needed
Before you start the insulation process, there are the materials you need to prepare:
- Spray foam insulation kit
- Gloves, goggles, mask, and coveralls
- Foam gun or spray foam equipment
- Painter’s tape and plastic sheeting for masking off areas
- Step ladder or scaffolding
- Utility knife for trimming excess foam
Insulation Step
Follow these steps to insulate your container warehouse with spray foam:
- Prepare the Container
Clean the container’s walls, floor, and ceiling from Any rust, dirt, or debris that can affect the adhesion of the foam with a wire brush or a pressure washer. Then, check for any visible cracks or gaps in the container that could cause heat or moisture to escape. Use caulking or expanding foam to seal these larger gaps for a more effective spray foam insulation result. Make sure you are wearing gloves, a face mask, goggles, and protective clothing as the chemicals used in the foam can be harmful if you inhale and make skin contact with them. - Mask Off Areas
Use painter’s tape and plastic sheeting to mask off areas you don’t want to spray foam on. - Apply the Spray Foam
Follow the instructions on the packaging to ensure proper activation of the foam. For spray foam that comes in canisters, the two chemicals are mixed as the foam is sprayed. Then, Spray the foam in even layers by holding the spray foam gun or nozzle about 12-18 inches from the surface in an even, sweeping motion.
Each layer should be applied in a series of light passes to ensure even coverage and avoid excess dripping or pooling. After spraying, give each layer time to expand and cure. This could take anywhere from 10 minutes to 2 hours.
- Trim Excess Foam
Once the foam has fully cured (usually within 24 hours), use a utility knife to trim away any excess foam that has expanded beyond the walls or ceiling. Be careful when trimming to avoid damaging the sprayed areas. - Finishing Touches
Make sure the warehouse is well-ventilated during and after the application. Spray foam can have a strong odor that dissipates once it cures. After curing, add a protective layer, such as a vapor barrier or a paint layer.
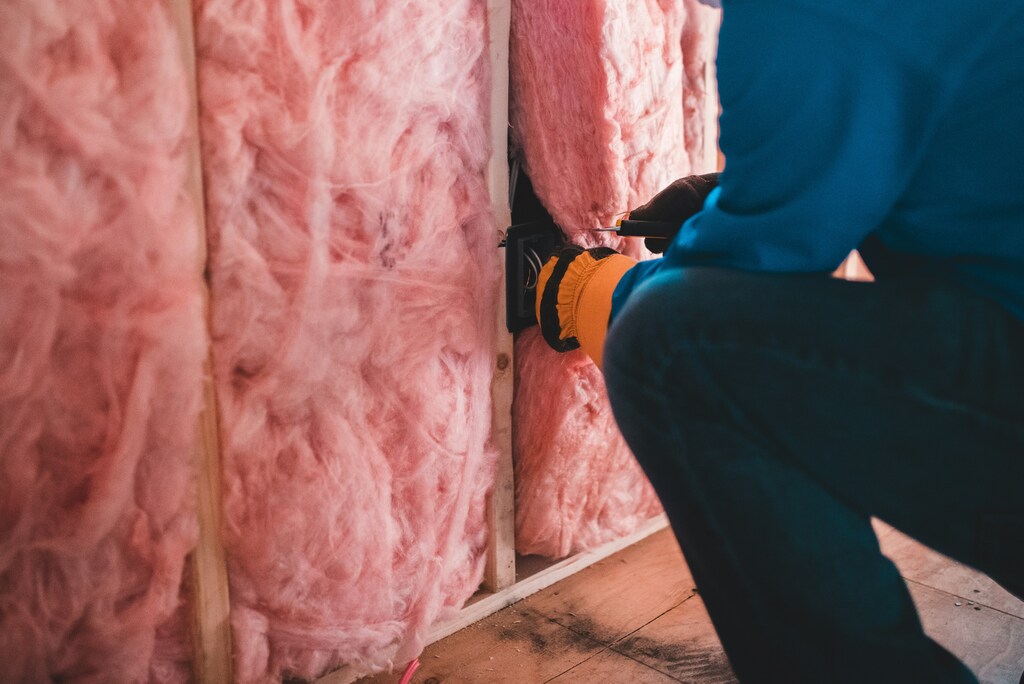
2. Fiberglass Insulation
Fiberglass insulation is lightweight and easy to install, making it a good choice for DIY projects. Although it is not as effective as spray foam insulation at preventing heat transfer, it provides good sound insulation and is less expensive than spray foam insulation.
Material Needed
Before you start the insulation process, there are materials you need to prepare:
- Fiberglass batt or roll insulation
- Vapor barrier
- Staple gun and staples
- Utility knife
- Measuring tape
- Caulk or spray foam for sealing gaps and cracks
- Gloves, mask, goggles, long-sleeve shirt, and pants
- Plastic sheeting
- Metal insulation supports
Insulation Step
Here’s a guide on how to insulate a shipping container warehouse with fiberglass insulation:
- Prepare the Shipping Container
Before applying the fiberglass insulation, thoroughly clean the inside of the container to remove dirt, rust, or any other debris to prevent mold growth. Then, seal any large gaps, cracks, or holes around doors, windows, or seams with caulk or expanding foam to seal these areas. - Install the Insulation
Measure the dimensions of the walls and ceiling where you will be installing the fiberglass insulation. Then, use a utility knife to cut the fiberglass batts or rolls to fit the space. Position the fiberglass batt or roll insulation between the container’s studs, beams, or framing. If you choose to use batt insulation, staple the edges of the insulation to the metal framing or studs using a staple gun. For roll insulation, use a staple gun or install support wires to hold it in place. - Install Additional Layers
Each layer should be installed with a slight offset, ensuring no gaps between the pieces. Make sure to add extra insulation around corners, doors, and windows to avoid air leakage. - Cover the Insulation (Optional)
cover the exposed insulation with a layer of plastic sheeting or another protective covering to keep the fiberglass in place and to prevent dust or particles from being released into the air. - Inspect the Insulation
Check for any gaps or spaces where heat or moisture could leak through with spray foam or additional caulk. Then, ensure your shipping container warehouse has proper ventilation, as a lack of airflow could lead to moisture buildup or poor air quality.
3. Reflective Insulation
This insulation uses a reflective material, such as aluminum foil, to reflect heat away from the container. This type of insulation is ideal for hot climates as it helps keep the container cool. It is a good choice for containers that will be used in areas with high levels of sunlight although it is not as effective as spray foam or fiberglass at preventing heat transfer.
Material Needed
Materials Needed:
- Reflective insulation such as foil-faced foam board or foil bubble
- Staple gun
- Measuring tape
- Utility knife or scissors
- Metal insulation support
- Vapor barrier
- Gloves, goggles, long-sleeve shirt, and mask
Insulation Step
This is a step-by-step guide on how to insulate a shipping container warehouse with reflective insulation:
- Prepare the Shipping Container
Remove any dirt, rust, or debris that may affect adhesion or the effectiveness of the insulation inside the container. Then, if you find any gaps or cracks, seal them with caulking, and spray foam. - Select the Right Reflective Insulation
There are 2 types of Reflective Insulation that you can choose, they are foil-faced foam board and reflective bubble insulation. Foil-faced foam board is rigid and provides both thermal insulation and reflective properties. Meanwhile, the Reflective bubble insulation is flexible and can be easier to handle in certain situations as it is made up of layers of bubble wrap sandwiched between two reflective foil layers. - Install the Reflective Insulation
Reflective insulation generally works best when installed in areas that experience direct sunlight, as it reflects radiant heat. Then, measure the interior dimensions of your shipping container and Use a utility knife to cut the insulation to fit the container walls, ceiling, and floor.
If you use a foil-faced foam board, place the foam board directly against the container walls or ceiling. Then, use a staple gun to secure the board to the metal. Meanwhile, if you use bubble wrap-style reflective insulation, staple it to the walls or use an adhesive backing to attach it to the metal. The reflective side should face out to reflect heat away from the interior. - Overlap Seams
Make sure the seams where the pieces of insulation meet are tightly overlapped to ensure no gaps to reduce the efficiency of the insulation. Use foil tape to seal the seams to prevent any air from entering through the seams. - Finish the Installation
Once the reflective insulation is installed, add a finishing layer or cover the exposed insulation to protect it from damage. Reflective insulation is effective at reflecting radiant heat, but it works best when paired with proper ventilation. Therefore, make sure the warehouse has adequate airflow to ensure that air circulates properly.
4. Insulated Panels
Insulated panels are prefabricated panels made of two sheets of steel with a layer of insulation in between. These panels can fit into the grooves between the walls of the container, making them easy to install. They are very effective at preventing heat transfer, providing sound insulation, are durable, and can help strengthen the container’s walls.
Material Needed
Materials Needed:
- Insulated panels
- Measuring tape
- Power drill and screws
- A sealant or caulking to seal seams and gaps
- Rubber gaskets or foam tape
- Screwdriver or impact driver
- Utility knife for cutting panels
- Gloves, goggles, and mask
Insulation Step
Steps on How to Insulate a Shipping Container Warehouse with Insulated Panels:
- Prepare the Shipping Container
Remove any dirt, rust, or debris from the inside of the container. This ensures the panels will adhere properly and eliminates any buildup that could affect insulation performance. Then, use caulk and foam to seal up the cracks or gaps to ensure optimal insulation. - Install the Panels
Begin by installing the panels on the interior walls of the container. Start at one corner and work your way along the wall. Repeat the process for the ceiling. As you install each panel, make sure the seams between the panels are slightly overlapped to prevent gaps where air could leak in. - Seal the Seams
Use sealant or caulking to seal any remaining gaps or seams between the panels. This will prevent air from entering or escaping, ensuring your insulation remains effective. - Finishing Touches
If there are any overhangs or rough edges on the panels, use a utility knife to trim them for a clean, neat finish. Install vents or fans to ensure adequate airflow, especially if you are using the warehouse for storing goods sensitive to humidity or heat.
Conclusion
Insulating a shipping container warehouse protects the goods stored inside and ensures the structure’s energy efficiency, comfort, and longevity. Therefore, you can create a more functional, durable, and comfortable space while protecting your investment and contents. We hope the guide on How to Insulate a Shipping Container above could help you!
Buy or rent shipping containers from us to convert them into a warehouse! Tradecorp is the industry leader and is widely known for its high-quality containers, which can be used for many creative applications. Fill out our quote form, and we’ll help you find the best container for your business goals!